The normal methods of using BitLocker would be either with a TPM Only, or a combination of TPM and either PIN or Start-Up Key. If you would like to use all the options you cannot do this in the wizard as you will get an error telling you there is a conflict in the policy. Therefore to enable all of the options you need to set it up mostly from the command line.
The first thing to do is enable the TPM in your motherboard BIOS, consult your computer / motherboard documentation on how to do this. When this is complete you will need to initialize the TPM in Windows.
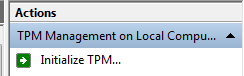
In a Run box type TPM.msc and click OK
Now click the Initialize button.
Now follow the instructions in the TPM Initialization wizard, this will probably involve a reboot and you may be prompted to accept the transfer of ownership of your TPM to Windows, this will be propitiatory to your computer / motherboard vendor.
When you have rebooted you will be prompted to create a TPM Owner Password. You can chose to generate a password automatically or input your own. Make your choice and click next. You will then be prompted to save the password or print it. If you save it I would save it to the USB Stick you will be using for your recovery key.
When you have done this click 'Initialize' then 'Close'.
The next thing to do is set-up the policy. If you want to enable FIPS 140 compliance now is a good time to do it. In a Run box type 'gpedit.msc' and click 'OK'
In 'Local Security Policy Editor' click to browse through 'Computer Configuration', 'Administrative Templates', 'Windows Components', 'Bitlocker Drive Encryption', 'Operating System Drives'
Double Click on 'Require additional authentication at startup'
Click 'Enabled' to enable the policy
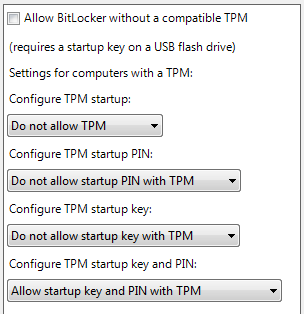
Uncheck 'Allow BitLocker without a compatible TPM'.
Set:
'Configure TPM startup' to 'Do not allow'
'Configure TPM startup PIN' to 'Do not allow'
'Configure TPM startup key' to 'Do not allow'
Set 'Configure TPM startup key and PIN' to 'Require startup key and PIN with TPM'
You might also wish to enable the policy 'Allow enhanced PIN' to allow you to create a complex pin which would include PIN's with upper and lower case with spaces symbols and numbers.
Now open an administrative command prompt.
Now we need to create a recovery key. Insert they USB stick you want to use as the recovery key. We will assume your recovery key has been mounted as E:
Type the command:
manage-bde -protectors -add C: -RecoveryKey E:
You will see output similar to the following:

You can verify the recovery file has been created by viewing the hidden files on the USB stick and looking for the file name under 'External Key File Name:'
Next we need to make the start-up key.
Eject the Recovery Key USB Stick and remove it from the computer and put is somwhere safe.
Now insert the USB stick you will use for the Start-Up Key.
Type the following command:
manage-bde -protectors -add C: -TPMandPINandStartupKey -tp YourPasswordGoesHere -tsk E:
Remembering to replace 'YourPasswordGoesHere' with your password.
NOTE: Your keyboard will be in the language for your locality, the Pre Boot Authentication is fixed to using a US keyboard so if you are in the UK and your PIN contains a £ you will not be able to type it. If your password has a # in it then it will be on Shift+3 or where the £ should be. So you will have to chose a password that user characters that are in the same location on your locality keyboard and a standard US keyboard.
You will see output similar to the following:
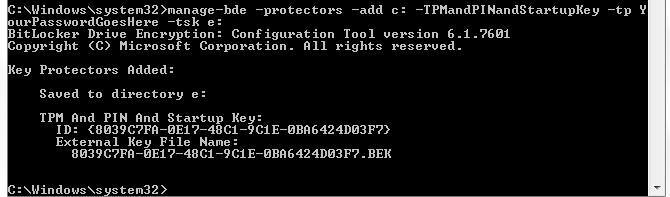
Again you can verify the recovery file has been created by viewing the hidden files on the USB stick and looking for the file name under 'External Key File Name:'
To begin the encryption leave the USB stick in the PC and then type the following command
manage-bde -on C:
You should get output like the following:
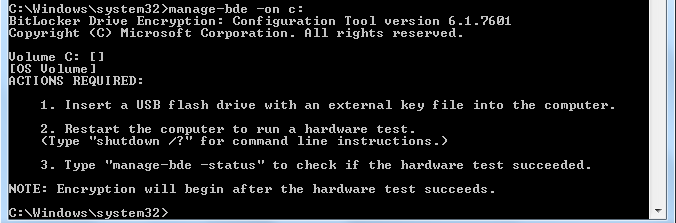
You will also get a bubble telling you to reboot.
When you restart if you still have the Start-up Key inserted you will be prompted for your password. If all goes well when Windows loads it will begin the encryption process.